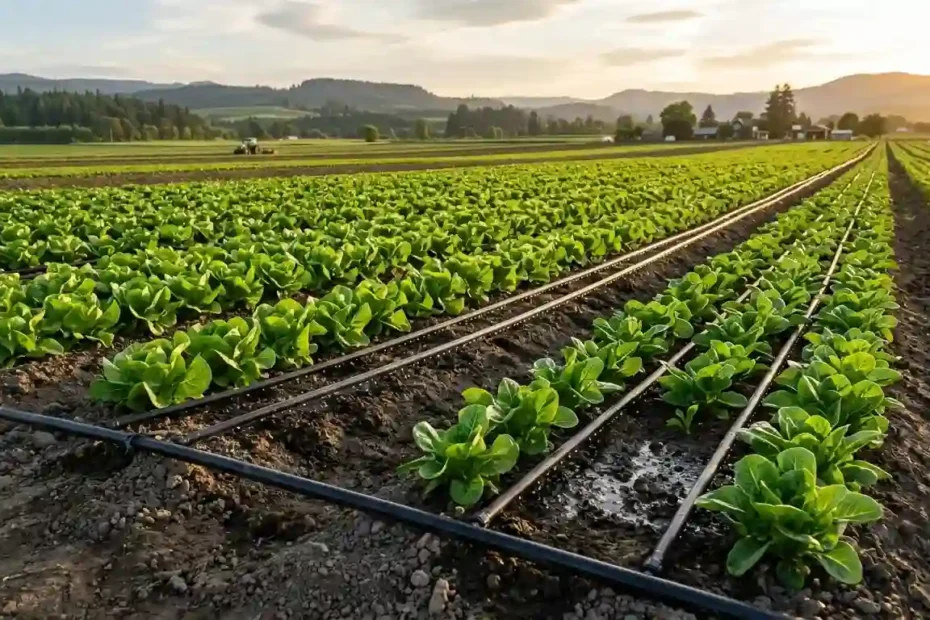
Watering your garden plants with a regular hosepipe is fine. If you are a farmer, though, it simply doesn’t work. On big fields, watering crops by hand is nearly impossible. Have you ever wondered how much water and time you waste this way?
Drip irrigation is one of the best innovations for saving these limited resources. The name says it all: “drip” means drop by drop, and “irrigation” means watering.
In short: drip irrigation is a water-saving method that delivers water slowly and directly to the plant roots through a network of pipes, valves, and emitters.
This guide covers how it works, the types, the benefits, the costs, and the best ways to improve its efficiency.
Minimum Wastage, Maximum Utility
Drip irrigation applies a slow, steady, and uniform stream of water directly to the soil near the plant roots. Its biggest advantage is that hardly any water is lost as runoff. The water percolates through the deeper layers of the soil, which also lowers the risk of soil erosion.
That’s not all. Here is why drip irrigation is far better than conventional watering.
Drip Irrigation vs. Traditional Watering
With hosepipe or flood watering, water touches the stems, leaves, and fruits, so the whole plant gets damp. Excess moisture, along with soil splashing onto the lower parts of the crop, carries harmful bacterial and fungal spores onto plant surfaces and slowly damages them. The result is poor crop yield and quality. (Learn more in our guide to fungal diseases in plants.)
Drip irrigation avoids this. Water falls calmly, drop by drop, so there is no soil splash.
Traditional irrigation also keeps crop roots submerged for long periods. This reduces the oxygen supply and invites diseases, especially fungal ones. The best-known example is root rot, which turns roots black and mushy.
How Does Drip Irrigation Work?
Also known as trickle irrigation or micro irrigation, the system is simple and practical. A network of tubes, valves, pipes, and emitters delivers water straight to the base of each plant. Large farm systems also place filters on the main pipeline to stop silt and dirt from clogging the flow path. This is the sequence:
- Pressure and flow control: Water is pumped from the source (by a pump or under natural gravity) into the main pipeline at very low pressure.
- Filtration: Dirt and silt are filtered out before the water reaches the distribution system and emitters, which greatly reduces clogging.
- Water transportation: After filtration, water travels through mainlines, sub-lines, and lateral pipelines to the field.
- Controlled emission: The ends of the lateral pipes are fitted with drippers (also called emitters), which release water slowly close to the soil or plant roots.
- Capillary action and gravity: Once in the soil, water moves into deeper layers through gravity and capillary action. This keeps the root zone moist but not waterlogged, so oxygen can still reach the roots. It also reduces evaporation and drainage losses, which helps prevent soil erosion and water pollution.
Watch this: https://youtu.be/MQNdGFI9wiQ
Types of Drip Irrigation
Drip systems come in two types. One releases water on the soil surface, and the other releases it below the surface.
- Above-ground (surface) drip irrigation
- Below-ground (subsurface) drip irrigation
Above-Ground vs. Below-Ground Drip Irrigation
| Feature | Above-Ground (Surface) | Below-Ground (Subsurface / SDI) |
| Placement | Laid on top of the soil or mulch layer | Buried 4 to 12 inches below the soil surface |
| Evaporation loss | Higher, as surface water is exposed to sun and wind | Minimal, as water goes directly to the roots |
| Weed control | Weeds can grow where water pools | Suppresses weeds, since the surface soil stays dry |
| Installation and cost | Low setup cost; easy DIY installation and quick repairs | Higher upfront cost; needs specialized trenching equipment |
| Lifespan and durability | Exposed to UV damage, weather, chewing pests, and tools | Durable; protected underground from weather and machinery |
| Maintenance | Easy to spot clogged emitters; simple to flush | Harder to inspect; needs good filtration and root-growth inhibitors |
| Best used for | Annual crops, home gardens, raised beds, changing layouts | Orchards, vineyards, permanent row crops, turf and lawns |
Which Drip Irrigation System Should You Choose?
The right system depends on your crop type, soil texture, water quality, field topography, and budget. Rather than a one-size-fits-all setup, a good installation balances these factors for maximum yield and water efficiency.
Crop Type and Field Layout
- Row crops and vegetables: Use an above-ground system with thin drip lines. The emitters come pre-spaced.
- Orchards and vineyards: Use heavy-walled drip tubing, which can run above or below ground.
- Large landscapes and heavily used areas: Use below-ground drip. It protects the lines from animals and mowing.
Know Your Soil Texture
Soil texture decides how water spreads after it leaves the emitter. A soil test will tell you what you are working with.
- Sandy soil drains fastest. Use closely spaced emitters with a higher flow rate.
- Loamy soil is the most balanced, as water moves evenly downward and outward. Emitter spacing of 12 to 18 inches suits it best.
- Clay soil drains slowest. Choose emitters with wider spacing and a very slow flow rate, so the soil has time to absorb the water and doesn’t waterlog or pool.
Land Topography and Slope
Land height directly affects water pressure. On rough or uneven fields, pressure differences can flood plants at lower levels while plants on higher ground go thirsty.
- Flat fields: Standard non-pressure compensating (NPC) drippers work well and are cost-effective in the long run.
- Sloping fields or long pipe runs: Pressure compensating (PC) drippers give every plant a uniform flow, even when pressure drops on hilly land or long laterals.
Test the Water Quality
Clogging is one of the biggest reasons drip systems fail, so check your water source first. The cleaner the water, the less strain on your filters.
- Well water with a lot of sand and grit: a sand separator (hydrocyclone) filter spins out heavy particles before they reach the main pipeline.
- Pond water and other surface sources: use a media (sand) filter or disc filter to remove organic matter and sand. Screen filters are not recommended, as organic material jams them quickly.
- Municipal water: this is comparatively clean, so a simple mesh screen or disc filter is usually enough to catch fine sediment.
At a Glance
| Field and Crop Scenario | Recommended System | Key Component Focus |
| Flat fields with seasonal vegetables | Above-ground surface drip tape | Economical thin-walled tape with pre-spaced drippers |
| Sloped orchard or vineyard | Heavy-wall tubing | Pressure compensating (PC) emitters |
| Permanent row crops in high-wind areas | Below-ground subsurface drip (SDI) | Root-intrusion inhibitors and vacuum relief valves |
| Dirty canal or pond water | Any drip layout | Media sand or disc filtration system |
Modern Drip Irrigation: Smart Add-Ons
The basics stay the same (filters, mainline pipes, valves), but modern systems add some useful components:
- Soil moisture sensors (such as tensiometers): These measure soil moisture before and after irrigation. Install them at different depths and points in your field.
- Automated controllers: These run the system on a set schedule, so you don’t have to track run times manually.
- Weather-based (evapotranspiration) controllers: Using real-time and forecast weather data, these controllers automatically reduce or skip a watering cycle when rain is expected.
- Fertigation units: “Fertilization + irrigation.” These add fertilizer to the irrigation water and deliver it straight to the roots, which cuts manual labor and saves time.
- Mobile app control: You can monitor and control the system from your smartphone.
These tools are part of the wider shift toward precision agriculture.
How to Install a Drip Irrigation System
Setting up drip irrigation is straightforward and can be done quickly. Installation generally involves three stages:
- Field design: Examine the area first. Its dimensions determine how much pipe and water you need, and you should note whether the land is flat, uneven, or sloped.
- Pipe arrangement: The crop and the need for uniform pressure and irrigation shape the layout. Decide between inline and online drippers, and between a surface or subsurface system.
- Testing: After installation, test the system to see whether adjustments are needed. Check that the pipes and drippers are positioned correctly and that pressure and flow are uniform.
How to Improve Drip Irrigation Efficiency
Maintain and Upgrade Your Filtration
Without proper filtration, emitters clog. This lowers efficiency, makes water delivery uneven, and can leave crops dehydrated. To prevent it:
- Flush the system periodically by opening the end caps of your lateral lines. This clears out fine silt and biofilm buildup.
- Clean or backwash your main filters (sand media, disc, or mesh screen) regularly to avoid pressure drops across the system.
Mulch the Soil
Drip irrigation targets the roots, but some water can still evaporate before the roots absorb it. Mulch acts as a protective shield over the wet soil zones and reduces the effect of sun and wind.
Cover your drip lines with organic mulch or black plastic mulch sheets. Both lock moisture into the soil and greatly cut evaporation losses. For more ways to save water on the farm, see our guide to water conservation methods in farming.
Drip Irrigation Setup Cost
Globally, a commercial agricultural drip system typically costs around $500 to 1,500peracre(1,200 to $3,700 per hectare) for basic to mid-tier surface systems. Costs vary widely by region, labor costs, and system design.
Drip Irrigation Cost in India
In India, a commercial drip setup costs roughly ₹15,000 to ₹80,000 per acre before subsidy, depending on crop spacing. Under the Pradhan Mantri Krishi Sinchayee Yojana (PMKSY), the central government provides financial assistance of 55% for small and marginal farmers and 45% for other farmers. Many states add their own top-ups, so check with your District Agriculture or Horticulture Officer. You can also read about other government schemes in agriculture for farmers.
For a small home greenhouse or backyard garden, pre-assembled DIY kits generally cost ₹1,000 to ₹5,000, depending on the number of plants.
Cost Breakdown per Acre (by Component)
A complete setup has several parts. For a close-spaced vegetable layout, the average split looks like this (about ₹48,000 to ₹85,000 in total):
| Component | Approx. Cost per Acre |
| Laterals and tubes (16 mm) | ₹18,000 – ₹28,000 |
| Drippers/emitters (2–4 LPH) | ₹8,000 – ₹15,000 |
| Filtration unit (sand + screen or disc) | ₹5,000 – ₹10,000 |
| Fertigation tank and venturi injector | ₹4,000 – ₹8,000 |
| PVC mainlines and sub-mains | ₹5,000 – ₹12,000 |
| Installation and labor | ₹8,000 – ₹12,000 |
Total Cost by Crop Type
Plant spacing directly decides how many feet of lateral pipe and how many emitters you need per acre, so cost changes with the crop.
| Crop Classification | Standard Spacing | Average Cost per Acre |
| Wide-spaced orchards (mango, coconut, cashew) | 15 x 15 ft to 30 x 30 ft | ₹15,000 – ₹25,000 (fewer lateral lines needed) |
| Medium row crops (banana, sugarcane, papaya) | 5 x 5 ft to 8 x 8 ft | ₹35,000 – ₹50,000 |
| Close-spaced vegetables (tomato, chilli, onion, ginger) | 2 x 2 ft to 4 x 4 ft | ₹50,000 – ₹80,000 (dense piping grids needed) |
What Can Increase the Cost?
- Automation layers: IoT integrations, automated solenoid valves, GSM modules, and smart soil moisture sensors add roughly ₹8,000 to ₹20,000 per acre.
- Topography: Sloped land needs higher-grade pressure-compensating (PC) emitters, which cost more than standard flat-land emitters.
Final Thoughts
Drip irrigation puts water exactly where plants need it. It saves water, protects roots and soil, and helps crops stay healthier. Match the system to your crop, soil, slope, and water quality. Keep your filters clean and mulch the soil, and your setup will deliver reliable results for years.